
Strava and Open Source Intelligence
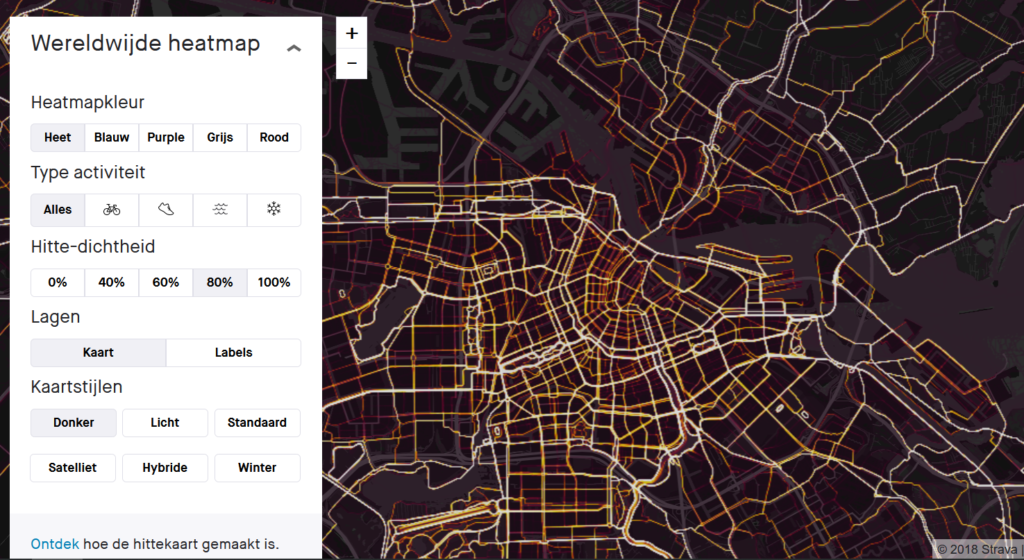
In recent years we have seen multiple blogs describing how the fitness app Strava (Strava.com) can be used within OSINT studies. For example, in January 2018 Nathan Ruser wrote that Strava has put millions of GPS points of users online through so-called “heatmaps” with which sensitive locations could be mapped. The international research collective Bellingcat published an article about this in July 2018 in which they describe how the work and private locations of military personnel can be mapped via Strava and Polar. In The Netherlands this led to political discussions.
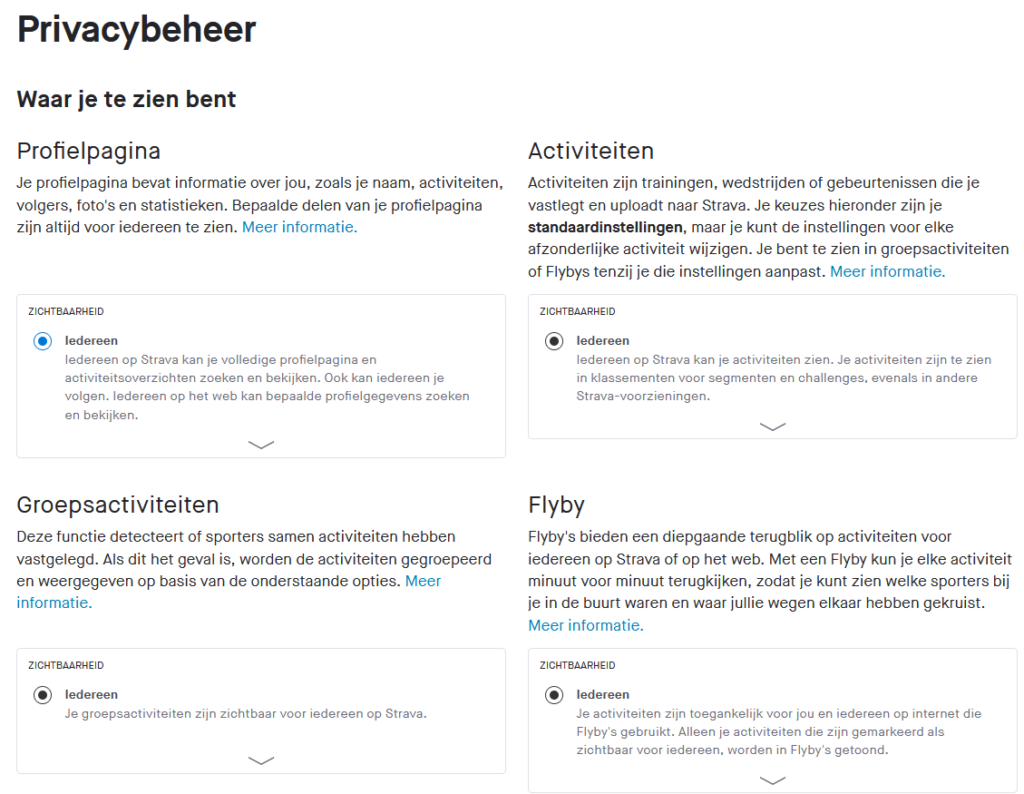
Fortunately, users can now protect their location data via their privacy settings. This means that activities marked as “private” by athletes will not be shown. But many athletes appear to be still active in sharing their location. Via https://www.strava.com/settings/privacy users can modify their privacy settings regarding their profile, activities, group activities and “flyby’s”. They can also change the privacy settings of so-called “local legends”, they can create privacy zones and they can adjust the visibility of their previous activities. Tip: set “flyby’s” to public, you will need these in a moment.
While Strava constitutes a breach of privacy and operational security (OPSEC) for one person, Strava is a source of information for another. For example, in 2018 Sebastian Schramm wrote an article on Keyfindings.blog that explains how Strava can be used to identify witnesses to an incident. Via “segments” (shared routes) you can map out which people have been active on a segment. And in addition: you can also see when that was. In this article, we’ll take a closer look at mapping witnesses through Strava by creating your own fake running route and uploading it to Strava.

Creating a route
To map witnesses to an incident, for example, we need two things. The first is the location of the incident and the second is the time when the incident occurred. In our example below, we pretend that an incident took place on May 25, 2021 around 12:30 pm in the Vondelpark in Amsterdam, The Netherlands. We can find this location in the desktop version of Google Earth Pro.

Then we click on “Add path” at the top, we give a name to the created path and we select the route on the map with our mouse.


You have now created a .gpx file that you can upload to Strava. However, the file you have created only contains a route. It is therefore important that you add “timestamps” to the route. In other words: you have to indicate where exactly you walked at what moment in time. For example, adding timestamps can be done via the website https://gotoes.org/strava/Add_Timestamps_To_GPX.php. Upload your .gpx-file, enter the date and time of the incident you are investigating, taking the time zone into account. Finally, also enter the speed at which you ran and click on “Upload”. Save the new .gpx-file.

Uploading the route
Now that you’ve created a route and added a time point, you can upload the .gpx-file to Strava. Log in with your (fake) account and select the plus icon and click on “Upload activity” and “File”.

Enter a title and fill in some other information as well. Then make sure that the route is visible to everyone. All set? Save the route.

Mapping witnesses through Strava
Now that you’ve created and uploaded a route, it’s time to see if you can find potential witnesses. In our case, we are looking for people who have been in or around the Vondelpark in Amsterdam around 12:30 on May 25, 2021. To map these people, we click on “View Flyby’s”. Is this button not there? Then make sure that your flyby’s are shared publicly (set this via the privacy settings).
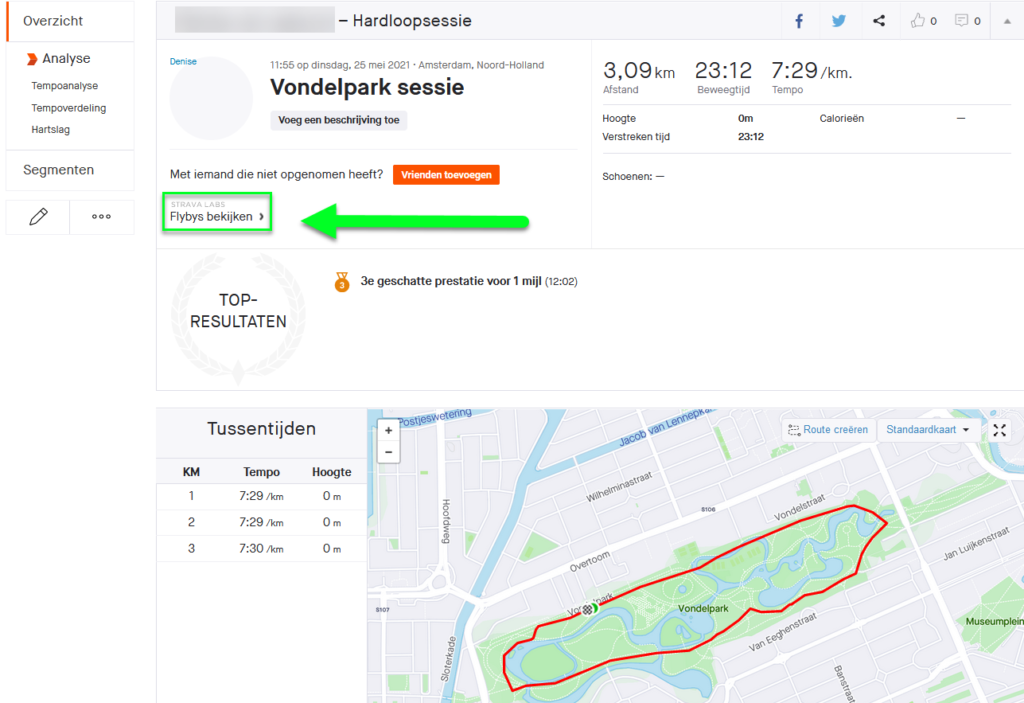
Have a look at the results. As you can see in the example below, a total of two other runners have been active on the same route and at the same time. You can play the route by clicking the play button. This allows you to see which person was at which location at a particular time. The third person in our example is not immediately visible at first. This is because it is only active a little later on the route. You can click on the person concerned to go to his or her profile to find out who that person is.
Note: Users flyby’s are no longer publicly shared by default. This means that users on Strava themselves have to actively share their route in order to make it visible for others. Although we will probably see fewer people as a result, this technique can still be useful in identifying witnesses to an incident. Sometimes a bit of luck is also needed.
1 Comment